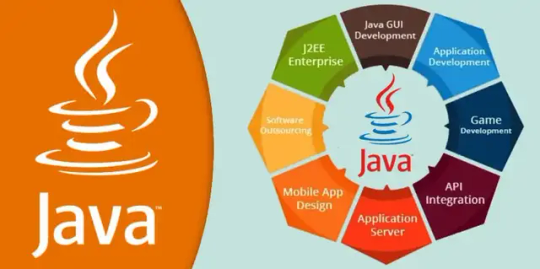
#Java Program steps
Explore tagged Tumblr posts
Visit Tumblr Blog
Explore Tumblr blogs with no restrictions, modern design and the best experience.
Last Seen Tumblr Blogs


Fun Fact
Users from the US are the majority of Tumblr visitors.
Text
How Do Job Descriptions for Java Developers Look?
1. Introduction to Java Job Descriptions
Getting a grip on job descriptions is key to moving forward in your career. When students want to know what Java developer job descriptions look like, it's helpful to break it down into skills, experience, and job expectations. Whether you're just starting a Java course in Coimbatore or finishing a java Full Stack Developer Course, job descriptions can help you connect your learning with what employers want. They typically list out responsibilities, required skills, and educational background.
Key Points:
- Common skills include Core Java, Spring, Hibernate, and tools for version control.
- Levels include Entry-level, mid-level, or senior roles.
- Keywords: Java for beginners, Learn Java step by step, Java internship for students
2. Core Skills Listed in Job Descriptions
A frequent question is what core skills are expected in Java job descriptions. Employers usually look for solid knowledge of Java syntax, object-oriented programming, data structures, and algorithms. These are basics you’ll cover in foundational Java training in Coimbatore.
Key Points:
- OOP concepts like inheritance, polymorphism, and abstraction are often must-haves.
- Java basics are essential for job readiness.
- Keywords: Java basics for students, Java tutorials for students, Java course with placement
3. Frameworks and Tools Required
Modern job postings often emphasize the need for skills in frameworks like Spring Boot and Hibernate. Familiarity with version control (like Git), build tools (like Maven), and IDEs (like Eclipse or IntelliJ) is usually required. If you're taking a Full Stack Developer Course in Coimbatore, you'll likely learn these tools.
Key Points
- Full stack Java includes front-end knowledge like HTML, CSS, and JavaScript.
- These frameworks are often covered in full-stack courses.
- Keywords: Java crash course, Java full stack course for students, Java online learning
4. Experience Level and Projects
Most employers specify the experience level in their job ads. A common phrase is Entry-level Java developer with 0-2 years of experience. Mini projects and internships are often counted as relevant experience for newcomers.
Key Points:
- Java mini projects can enhance your resume.
- Internships are a valuable way for students to gain industry exposure.
- Keywords: Java mini projects, Java internship for students, Java programming course near me
5. Educational Qualifications & Certifications
Most job ads request a B.E./B.Tech in Computer Science or something similar. Having certifications can really help, especially when it comes down to choosing between similar candidates. If you’re taking a Java certification course in Coimbatore, that's a plus.
Key Points:
- Java coaching classes help prepare you for certifications.
- Certifications boost credibility for entry-level Java jobs.
- Keywords: Java certification course, Java coaching classes, Easy Java programming
6. Job Roles and Responsibilities
As you look into Java job descriptions, you'll notice they commonly mention tasks like code development, testing, bug fixes, and integration. These tasks are part of what you would learn in any Java training program in Coimbatore.
Key Points:
- You’ll need to write clean, scalable Java code.
- Understanding of SDLC and Agile is often required.
- Keywords: Java developer jobs for freshers, Java job interview questions, Java tutorials for students
7. Soft Skills and Team Collaboration
In addition to technical skills, job descriptions often mention the importance of communication and teamwork. A Full Stack Developer Course in Coimbatore might focus on soft skills to make students ready for the job market.
Key Points:
- Being a team player and communicating well is important.
- Employers often look for a problem-solving mindset.
- Keywords: Java course with placement, Affordable Java course, Java for beginners
8. Learning Opportunities and Growth
Employers often discuss opportunities for growth in their job postings. So when you wonder what Java job descriptions include, think about the chances for learning and advancing your skills.
Key Points:
- There's potential to move up into senior roles.
- Continuous learning is often encouraged through various workshops.
- Keywords: Learn Java step by step, Java online learning, Java weekend classes
9. Location, Salary, and Work Conditions
Job descriptions often specify locations, such as Java developer jobs in Coimbatore, and discuss work conditions, remote options, and salary ranges. This is especially important for students seeking roles after a Java course.
Key Points:
- The IT sector in Coimbatore is on the rise and hiring Java developers.
- Weekend classes can accommodate working students.
- Keywords: Java weekend classes, Java developer jobs for freshers, Java job interview questions
10. Conclusion
In summary, if you’re still curious about Java job descriptions, they typically focus on technical skills, real-world experience, and soft skills. Courses like the Full Stack Developer Course in Coimbatore and other Java training programs prepare you for these job requirements.
Key Points:
- Pick institutions that offer practical and placement support.
- Practical skills often matter more than just theoretical knowledge.
Frequently Asked Questions (FAQs)
Q1. What are the must-have skills in a Java job description?
You should have a good understanding of Core Java, OOPs, Spring Framework, and some basic database handling.
Q2. Is it easy for beginners to get Java jobs?
Yes, many companies are ready to hire freshers for Entry-level Java roles.
Q3. Does having a Java certification help me get hired?
Yes, certifications show that you’re serious and have the technical know-how.
Q4. What’s the average salary for a fresh Java developer in Coimbatore?
It tends to be between ₹2.5 LPA to ₹4 LPA depending on your skills and certifications.
Q5. Is project work important for Java job applications?
Yes, mini projects and internships provide the hands-on experience that employers really want.
#Java programming language#Java tutorials for students#Learn Java step by step#Java basics for students#Java for beginners#Easy Java programming#Java online learning#Java course with placement#Java internship for students#Java coding exercises
0 notes
Text
What are the 5 steps of Java programming?
Java is one of the most widely used programming languages in the world, renowned for its portability, robustness, and scalability. Whether you're building Android apps, desktop software, or enterprise-level solutions, Java provides a structured and efficient development process.
To effectively write Java programs, it’s essential to understand the five key steps involved in Java programming. These steps form the foundation for writing, compiling, and running Java code smoothly.
This article will walk you through each of these steps in detail and help you understand how a Java program goes from idea to execution.
Step 1: Writing the Java Code (Source Code Creation)
Every Java program begins with writing the source code using a text editor or an Integrated Development Environment (IDE) like IntelliJ IDEA, Eclipse, or NetBeans.
The source code is saved with a .java extension and typically includes:
Class definitions
Methods
Variables
Control structures
Object-oriented principles like inheritance and encapsulation
At this stage, understanding the syntax and structure of Java is essential, which is thoroughly taught in Best Java training, especially for beginners.
Step 2: Compiling the Java Program
Once the source code is written, the next step is compilation.
Java uses a compiler (javac) to convert the human-readable source code into bytecode, which is stored in a .class file. Bytecode is an intermediate language understood by the Java Virtual Machine (JVM).
Step 3: Loading the Class File (Class Loader)
Before executing, the compiled bytecode must be loaded into memory. This is where the Class Loader comes in. The JVM’s class loader loads the .class files and prepares them for execution.
There are three main types of class loaders in Java:
Bootstrap ClassLoader
Extension ClassLoader
Application ClassLoader
These work together to load the required classes and dependencies into memory in a hierarchical manner.
This phase also verifies the bytecode to ensure it’s safe and conforms to JVM rules.
Step 4: Bytecode Verification and Linking
Once the class is loaded, the bytecode is verified for security. The JVM ensures that the bytecode does not perform illegal operations like accessing private memory or performing unauthorized casts.
Key activities in this step:
Type checking
Stack map verification
Symbol resolution
Preparing memory for static variables
This is one of the reasons Java is considered a secure language—the JVM won’t run unverified code.
Step 5: Execution by JVM (Interpretation or JIT Compilation)
Finally, the verified bytecode is executed by the Java Virtual Machine. The JVM reads the bytecode and executes it either by interpreting each bytecode instruction or compiling it into native machine code using the Just-In-Time (JIT) compiler.
The JVM ensures that the Java application runs on any operating system where the JVM is installed, fulfilling Java’s promise: “Write once, run anywhere.”
Bonus: Understanding the Lifecycle of Java Execution
To recap the complete process:
Write Java code (.java)
Compile code into bytecode (.class)
Load class files into memory
Verify & link bytecode for safety and preparation
Execute via JVM
Each step is designed to ensure that your program is secure, efficient, and portable, which is why Java remains a top choice for developers worldwide.
Why Learning Java the Right Way Matters?
If you're just starting your Java journey, mastering these five steps is crucial. Enrolling in a structured course—like those offered at the Best Java training classes in Chandigarh—can help you gain real-world knowledge, hands-on practice, and guidance from industry experts.
With project-based learning, live mentoring, and certification support, such courses ensure you're not just learning Java—you’re learning how to use it effectively in real development environments.
Conclusion
Understanding the five fundamental steps of Java programming helps demystify the development process. From writing clean code to executing it on the JVM, each step plays a vital role in delivering robust and platform-independent applications.
By mastering these stages—and reinforcing them through practice—you’ll become a confident and capable Java developer, ready to tackle any programming challenge.
0 notes
Text
NEW DAVEKAT SHIMEJI TUTORIAL
(easier to install + more actions and behaviors) tutorial to install these cute desktop buddies under the cut:
This version comes with improved actions, better animation timing, and less randomness. They can now flirt, draw dicks, sleep, and lay on the floor together.
STEP 1: INSTALL JAVA
Click the download button and install it. If you need to remove older versions of Java, download their removal tool and run it before installing the latest version.
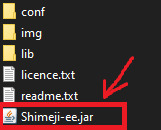
STEP 2: DOWNLOAD FILES
STEP 3: EXTRACT FILES.
Extract what you just downloaded. Find it in your Downloads and right-click it, then click Extract All. It will create a new folder called shimejiee.
STEP 4: ATTEMPT TO LAUNCH
Double-click the Shimeji-ee.jar file. If it works, skip to step 5. If it asks you what program to open the file with or gives an error message, you need to watch this video at 1:05 and follow the instructions there. You can move the shortcut you make to your Desktop to access the shimeji easier if you’d like.
STEP 5: YOU’RE DONE BABEY!
Launch Shimeji and it should work as intended. If you don’t like them throwing your windows around or multiplying, you can turn off those behaviors in the settings. You can safely remove all zipped folders, they are now useless. Click here to learn how to make the program run when you start Windows.
231 notes
·
View notes
Text
Holoatypical: Dev Log 1

Number one in what's hopefully going to be a pretty long series of updates!
So, first things first: Godot rocks. I've been using it for two weeks now, having switched from GameMaker (and before that, Twine, and before that, Java and JavaScript), and Godot does so much of the heavy lifting for you. It genuinely feels like an engine that's designed for making games. Unlike GameMaker, which was like wading through molasses every step of the way, while some sort of molasses shark is biting at your ankles. And I've coded in JavaScript.
Second, let me show you what I've been up to!

As you can see, I'm working on a prototype to try out the merging mechanic. It's got some (ha) bugs, and dragging things could be smoother, but the critters do actually snap into the grid and merge now, and I'm very pleased with that.
This chamber you see here is going to be the lab. As it's planned right now, the player will have infinite initial building blocks (eggs, spores, seeds...), which merge into different critters depending on environmental variables (artificially set in the lab) and on which other specimens are currently in the chamber. The challenge is to figure out the right parameters. I have no idea how big the chamber needs to be for that, but that's not really an issue, because...
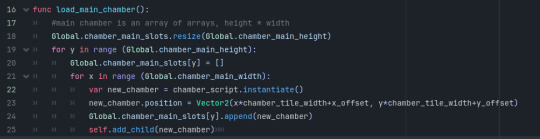
This isn't so much a prototype as I'm just straight up building the foundations for a game, which is why it's taking me so long. The grid you see here is controlled with a few variables, and everything is flexible enough that I can simply change the grid size during playtesting and it still works.

The tile grid is an array of arrays, filled with slot nodes that I instantiate at runtime. Is this the best way to learn a new program and language? Haha. Who knows.
Specimens have a sprite sheet with all their stages on it, and when a critter levels up, the part that's visible to the player just needs to be shifted 64 pixels to the right.

That's x starting point, which is the specimen stage/level times 64, then y starting point, width, and height. Fun! So easy!!
As to the sprite sheet, I'm going against common advice and making these big. The 1bit style is super fast to do, and in my opinion, a certain level of detail is important to make the sprites look like anything. I'm moreso playing with the look than really wanting to make a retro game.

This sheet only took me an evening! I'm enjoying it because it really forces you to abstract the shape and focus on what's most important about the critter. (This is a style test - I haven't decided yet how weird I want to go with these vs making them look more natural.)
Next up will be ironing out the kinks, making an egg dispenser and a specimen incinerator so the field can be filled up and emptied, coming up with a few more specimen, and then going into play testing.
But in the next dev log, you're probably going to hear way more about the story and the characters. I am eyeing a visual novel extension for Godot (dialogic), which, if it does what I think it does, is going to take a lot of work off my hands and only leaves me with writing the actual dialogue, which I've already started on.
@tragedycoded @badscientist @curiouscalembour @writingrosesonneptune @gioiaalbanoart @monstrify @cowboybrunch @tsunamiscale @marlowethelibrarian
Was this format interesting? Less code? More code? Anything you specifically want me to talk about in this process? Let me know!
19 notes
·
View notes
Text

How to Learn Java Step by Step: Core Concepts
Java is one of the most popular programming languages used by over 9 million developers worldwide. Learning Java opens up opportunities across many industry verticals. This section provides an overview of Java, reasons to learn it, and the key concepts you'll need to know to get started.
14 notes
·
View notes
Note
As the person I follow who does reverse engineering, do you have any suggestions for finding resources on reverse engineering Android apps?
Specifically, there's an app I'm playing with, where after seeing the structure of the "export as Markdown" output I want to know what the internal structure and representation of the data is. The end goal of understanding it is to be able to add certain kinds of data dynamically, rather than up front. That's certainly doable typing in raw markdown, but being able to do it "app style" would be more convenient.
The google Play Store entry does not mention any open source licenses, or looking for the source code and hopefully a git repo or something would have been my first step.
(I'll probably need to bang together a crappy app to do what I really want regardless, but maybe this app's data structure would be more convenient than doing so with markdown.)
So, android stuff:
First you need the APK. You can do some trickery with your phone to pull it over the ADB connection if you install the android SDK, but generally I just google "app name APK" and you'll find some greymarket site that'll give you a copy.
Secondly, APKs are just ZIP files (JAR files, technically, but JAR files are also just ZIP files!). Unzip them and you can find lots of interesting stuff, often.

For disassembling/decompiling them, my go-to program is jadx. It's a java decompiler that's been around a while and can natively open APK files and decompile them. There's some weirder new APKs that it can't handle (something to do with a newer bytecode revision, I think?) but I can't recall the details on how you handle those. Those are rare, in my experience. jadx is pretty good, but you'll occasionally find methods or entire classes that it just can't figure out, and it'll give you a bytecode dump. I don't yet have a good solution for those, other than "get good at reading JVM bytecode".
If you're dealing with games, another useful thing can be UABE and dotPeek. These are unity/C# tools, but you would be surprised how many android games (and non-games!) are actually unity under the hood.
Bluestacks can also be useful, because it'll let you run the app on your desktop and that can be handy for things like running WireShark to log all network traffic.
Speaking of logging, the other handy thing I've done is enabling android developer mode on my phone to get to one specific option: Bluetooth HCI snoop log.
Now, actually getting that log is tricky and varies from phone to phone, because for some reason manufacturers like to move it around, but it's one of the best ways to reverse engineer bluetooth communication stuff. You basically turn on the log and everything your phone does to communicate with your Smart Toothbrush or whatever will be logged to a file, then you can yank that file over and stuff it into Wireshark.
So... hopefully some of that is a helpful start? I've not done a huge amount of Android reversing so I'm not super familiar with the tools used, but these are the ones I've got on hand for when I do.
also sorry for all the horny robotgirl posters who saw "android reverse engineering" in the tags and thought this was gonna be about taking them apart with screwdrivers and rooting around in their insides. Not today!
108 notes
·
View notes
Text
How to Build Software Projects for Beginners

Building software projects is one of the best ways to learn programming and gain practical experience. Whether you want to enhance your resume or simply enjoy coding, starting your own project can be incredibly rewarding. Here’s a step-by-step guide to help you get started.
1. Choose Your Project Idea
Select a project that interests you and is appropriate for your skill level. Here are some ideas:
To-do list application
Personal blog or portfolio website
Weather app using a public API
Simple game (like Tic-Tac-Toe)
2. Define the Scope
Outline what features you want in your project. Start small and focus on the minimum viable product (MVP) — the simplest version of your idea that is still functional. You can always add more features later!
3. Choose the Right Tools and Technologies
Based on your project, choose the appropriate programming languages, frameworks, and tools:
Web Development: HTML, CSS, JavaScript, React, or Django
Mobile Development: Flutter, React Native, or native languages (Java/Kotlin for Android, Swift for iOS)
Game Development: Unity (C#), Godot (GDScript), or Pygame (Python)
4. Set Up Your Development Environment
Install the necessary software and tools:
Code editor (e.g., Visual Studio Code, Atom, or Sublime Text)
Version control (e.g., Git and GitHub for collaboration and backup)
Frameworks and libraries (install via package managers like npm, pip, or gems)
5. Break Down the Project into Tasks
Divide your project into smaller, manageable tasks. Create a to-do list or use project management tools like Trello or Asana to keep track of your progress.
6. Start Coding!
Begin with the core functionality of your project. Don’t worry about perfection at this stage. Focus on getting your code to work, and remember to:
Write clean, readable code
Test your code frequently
Commit your changes regularly using Git
7. Test and Debug
Once you have a working version, thoroughly test it. Look for bugs and fix any issues you encounter. Testing ensures your software functions correctly and provides a better user experience.
8. Seek Feedback
Share your project with friends, family, or online communities. Feedback can provide valuable insights and suggestions for improvement. Consider platforms like GitHub to showcase your work and get input from other developers.
9. Iterate and Improve
Based on feedback, make improvements and add new features. Software development is an iterative process, so don’t hesitate to refine your project continuously.
10. Document Your Work
Write documentation for your project. Include instructions on how to set it up, use it, and contribute. Good documentation helps others understand your project and can attract potential collaborators.
Conclusion
Building software projects is a fantastic way to learn and grow as a developer. Follow these steps, stay persistent, and enjoy the process. Remember, every project is a learning experience that will enhance your skills and confidence!
3 notes
·
View notes
Text
Computer Lover

Names Maxwell/Maxie I'm a nonbinary computer science major stepping into the whole programming thing.
Currently learning Python🐍 and Java
Also learning Japanese and trying to refresh my French, and slowly but surely trying to love Math
Other interests are TTRPG, video games, books, sci-fi and horror movies, art and computers. I'll probably post whatever notes and project developments i work on.
You can find me on the following: Insta: @ ovijabro Github: @ ovijabro artblog/fandom: @m00nymcmoon
Terfs/Radfem, queerphobic, n*zis, DNI buzz off.
13 notes
·
View notes
Note
If you don't know the answer that's fine but I wanted to ask about Minecraft coding. I heard the reason Bedrock exists was to rebuild Minecraft from the ground up without Java code because Java as a language just fucking sucks, but whenever I hear anything about Bedrock, it has like 500x more game breaking bugs a week than what Java usually deals with, which seems counterintuitive, any idea why that's the case or is it just something I am misunderstanding
See, there's a thing in programming I like to call "Everyone is stupid except me"
Everyone thinks some language is the final solution to something, when in reality it has just as many problems as the language that was previously used for the problem, which was supposed to be the solution to the problem, and then the same for the one before it, and so on
This is the same issue at play here
While yes, it's true, Java code sucks major ass because of how verbose it is, and how it forces everything into an object oriented programming paradigm, and how Java actually runs in a virtual machine
Java files aren't actually compiled to machine code, but instead .class files, which is Java bytecode (which is essentially an intermediate step between the language and machine code), which are then interpreted by the JVM (Java Virtual Machine)
To my knowledge, Bedrock Edition has a C++ codebase, which directly compiles to machine code, meaning (in theory) better performance, as there's no stupid overhead from having a language virtual machine
However, because of differences in how Java and C++ work, you get slightly differences between the games, especially in the physics engines and how math is done between the two
This creates the problem I described earlier "Everyone is stupid except me"
It can't be denied that Java Edition has a more mature codebase, as it's literally existed longer than Bedrock Edition, and so it's likely to be more stable in a sense
However, Java as a language still sucks balls, no matter how old the code is
A C++ rewrite is supposed to fix the issues with Java being an absolute kick in the balls to work with, but C++ itself has its own issues, and due to differences in the language and the younger, less mature codebase, there are more game-breaking bugs that have yet to be ironed out
In short, XKCD 927
5 notes
·
View notes
Text
why be an academic
be an academic because curiosity is the fuel to passion. because curiosity is the stepping stone to gaining knowledge. because knowledge is the most powerful weapon an individual can possess
because no one can take away your knowledge from you. because knowledge is what you need to lead strong arguments. because life has no meaning without it. because knowledge is what you need to live - to flourish - to evolve - to discover - to explore - to love - to complain - to enjoy little things in life. gaining more knowledge gives you the knack for appreciation of the little things in life. it makes you experience unexpressed emotions because you start exploring their depths. you understand why stars exist. you understand the purpose of your existence. you can suddenly converse in languages you never imagined conversing in.
that is the beauty of knowledge understanding things others don't because you studied them by sitting at your desk late the previous night. devouring over your books with your pen in one hand and highlighter in the other. solving myriads of physics numerical and deriving equations that scholars worked on ages ago. studying various chemical equations so that if anyone asks you any one, you wouldn't have to think twice before answering it. reading shakespeare with your ankles crossed, brows knit up, wrinkled forehead with the smell of coffee in the air knowing that you would think of the scene in the book for a long time after. typing away code scripts for java programs trying to figure out their logic. a calmness engraved inside your mind- knowing that all of this will help you in the end.
in the end, when everyone will be scrambling and looking around for notes, you will be revising them the third time as if it's normal to do so. when everyone's faces will hold fear, yours will hold confidence. when others will sob, you will grin proudly. which is why knowledge is power. and if you have the resources to gain this immense power, do not let them go to waste.

#reading#motivation#my writing#100 days of productivity#notes#knowledge#power#light academia#dark academia#chaotic academia#classic academia
42 notes
·
View notes
Text
Introduction to SkillonIT Learning Hub- Empowering Rural Talent With World-Class IT Skills
SkillonIT provides IN-Demand IT courses, connecting Rural talent with rewarding IT skills through affordable, accessible and career-focused education. with Guaranteed pathways to internship and high paying jobs, start with us and step into Opportunities at top Tech-leading Companies. Skillonit Learning Hub, located in Buldhana, Maharashtra, is a leading institute dedicated to equipping individuals with cutting-edge technology skills. With a mission to bridge the digital divide, the institute provides high-quality education in various IT and professional development domains. Skillonit focuses on practical, industry-oriented training, ensuring students gain the expertise needed to thrive in today’s competitive job market. The hub is committed to empowering rural talent and shaping the next generation of skilled professionals.

Courses Offered Skillonit Learning Hub offers a diverse range of courses tailored to industry demands, enabling students to master both technical and professional skills.
Blockchain Development — Smart Contracts (Solidity, Rust, Web3.js, Hardhat) — Blockchain Protocols (Ethereum, Solana, Binance Smart Chain, Fantom) — Decentralized Applications (DApps) Development
Front-End Development — HTML, CSS, JavaScript — Frameworks: React.js, Vue.js, Angular — Responsive Web Design & UI Frameworks (Bootstrap, Tailwind CSS)
Back-End Development — Server-side Programming (Node.js, Python, PHP, Java, .NET) — Database Management (MySQL, MongoDB, Firebase, PostgreSQL) — API Development (RESTful APIs, GraphQL, WebSockets)
Full-Stack Development — Front-End + Back-End Integration — MERN Stack Development — Database, Deployment & DevOps Practice
Mobile App Development — Cross-Platform Development (Flutter, React Native)
Unity 3D Game Development — Game Mechanics & Physics — C# Programming for Game Development — Virtual Reality (VR) & Augmented Reality (AR) Integration
Professional UI/UX Design — User Interface Design (Adobe XD, Figma, Sketch) — User Experience Principles — Prototyping, Wireframing & Usability Testing
Professional Graphic Design — Adobe Photoshop, Illustrator, and CorelDraw — Branding & Logo Design — Digital Art & Visual Communication
Digital Marketing — SEO, SEM, and Social Media Marketing — Content Marketing & Copywriting — Google Ads, Facebook Ads & Analytics
Spoken English — Communication Skills & Public Speaking — Accent Training & Fluency Improvement
Personality Development — Business & Corporate Etiquette — Confidence Building & Interview Preparation — Leadership & Teamwork Skills
Location & Contact : Address : Chhatrapati Tower, Above Maratha Mahila Urban, 3rd Floor, Chikhali Road, Buldhana, Maharashtra, 443001.
Contact us
Conclusion : Skillonit Learning Hub is revolutionizing IT and professional education by making technology and essential career skills accessible to aspiring developers, designers, marketers, and professionals. With a strong emphasis on practical learning, industry exposure, and career opportunities, it stands as a beacon of growth for young talent in Buldhana and beyond. Whether you are looking to build a career in tech, marketing, design, or personal development, Skillonit provides the ideal platform to achieve your goals. Join Our Social Community
Skillonit #Education #ITCourses #Buldhana #Maharashtra #IT #Blockchain #Fullstack #Front-end #Back-end #MobileApp #Unity3d #UIUX #Graphicdesign #Digitalmarketing #SpokenEnglish #Personality #development
2 notes
·
View notes
Text
ByteByteGo | Newsletter/Blog
From the newsletter:
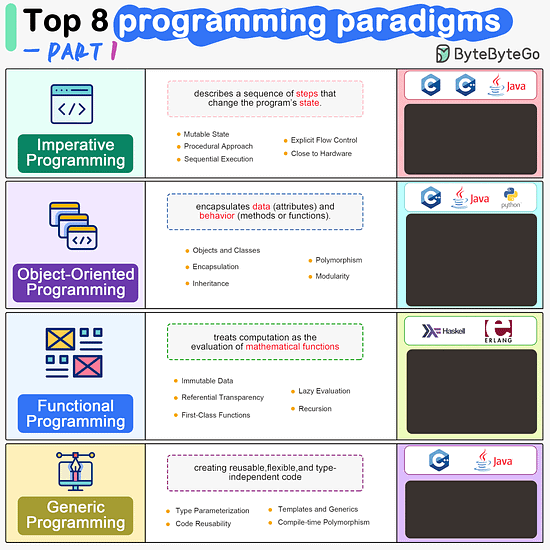
Imperative Programming Imperative programming describes a sequence of steps that change the program’s state. Languages like C, C++, Java, Python (to an extent), and many others support imperative programming styles.
Declarative Programming Declarative programming emphasizes expressing logic and functionalities without describing the control flow explicitly. Functional programming is a popular form of declarative programming.
Object-Oriented Programming (OOP) Object-oriented programming (OOP) revolves around the concept of objects, which encapsulate data (attributes) and behavior (methods or functions). Common object-oriented programming languages include Java, C++, Python, Ruby, and C#.
Aspect-Oriented Programming (AOP) Aspect-oriented programming (AOP) aims to modularize concerns that cut across multiple parts of a software system. AspectJ is one of the most well-known AOP frameworks that extends Java with AOP capabilities.
Functional Programming Functional Programming (FP) treats computation as the evaluation of mathematical functions and emphasizes the use of immutable data and declarative expressions. Languages like Haskell, Lisp, Erlang, and some features in languages like JavaScript, Python, and Scala support functional programming paradigms.
Reactive Programming Reactive Programming deals with asynchronous data streams and the propagation of changes. Event-driven applications, and streaming data processing applications benefit from reactive programming.
Generic Programming Generic Programming aims at creating reusable, flexible, and type-independent code by allowing algorithms and data structures to be written without specifying the types they will operate on. Generic programming is extensively used in libraries and frameworks to create data structures like lists, stacks, queues, and algorithms like sorting, searching.
Concurrent Programming Concurrent Programming deals with the execution of multiple tasks or processes simultaneously, improving performance and resource utilization. Concurrent programming is utilized in various applications, including multi-threaded servers, parallel processing, concurrent web servers, and high-performance computing.
#bytebytego#resource#programming#concurrent#generic#reactive#funtional#aspect#oriented#aop#fp#object#oop#declarative#imperative
8 notes
·
View notes
Text
HOW TO SWITCH TO LINUX
So, we're going to go through this step by step.
Before we begin, let's keep a few things clear:
Linux is not Windows, it is its own system, with its own culture, history and way of doing things.
There are many "distributions", "distros" or "flavors" of Linux. What works for you may be different from what people recommend.
You'll want to read up on how to use the terminal; the basics an absolute beginner needs is short, but important. It's not hard to learn, just takes a bit of time and effort.
ADOBE DOES NOT WORK ON LINUX.
WINE is not a Windows Emulator, it should not be treated as such.
Proton is a compatibility tool built on WINE by Valve, which has its own compatibility database, called ProtonDB. It still isn't an emulator and can have quirks.
Not everything will work on Linux. Dead by Daylight actively blocks Linux players from joining a game, as an example. The Windows Edition of Minecraft is another. (But the Java Edition does!)
There are many FOSS alternatives to popular programs, but they may lack maturity and features compared to their commercial counterparts.
You might want to invest in an external drive. It'll keep your files safe and you'll be able to move all your files to a
Step 1: why do you want to switch? Are you concerned about privacy? Are you wanting to boycott Windows? Is 11 not an option for your hardware? Want to try something new? Be honest with yourself on what you want to do. Write down your hardware specs. You'll want to know what kind of processor, RAM, video card and memory you're working on.
Step 2: Make three lists: Programs you need for work, programs you use at home (that aren't games) and games you like to play. Check each of these for if they already have a Linux port. For games, you can check if it's Steamdeck compatible! For those where you can't find one or it's not clear, you can check for the program on WINE HQ and ProtonDB (for games.) Not all of them might be compatible!
There might be Linux-based alternatives for several things, but keep in mind that Adobe does NOT support Linux and does NOT work on WINE! Sea of Thieves and LibreOffice works, Dead by Daylight and Scrivener do not.
Step 3: Get a GOOD QUALITY USB drive stick! I recommend one that's at least 30 GB. That sounds like a lot, but operating systems these days are huge-but there's some fun stuff you can get. It's really important that you get a good quality one, not just a random stick off a reseller like Wish.
Step 4: Remember when I asked you why you were switching? Time to pick a Linux version. There is no "one, true Linux" version-the operating system is open, groups make their own versions and put it out into the world. If you're confused, check out Distrowatch. Read a list here. Download an option-if you have a few sticks around, try multiple ones.
Step 5: Plug in your USB and use either UNetbootin or Rufus to create your boot device. Rufus might be easier if you're not super computer savvy. When looking over the options, make sure there's some storage, set it to most of what's left. Take out your boot stick for now.
Step 6: Find out how to boot to your BIOS. Every computer has a BIOS. Check out your model of laptop/motherboard to figure out what it is. Arrange boot order so that your USB gets checked first.
Step 7: If you have an external drive, move all your personal stuff, game saves, etc to it or purchase cloud drive storage for it. Always back up your files, and with multiple methods.
Step 8: You aren't going to be installing Linux quite yet; instead, boot it up from USB. Note, it'll be a bit slow on USB 2.0, though a USB-3 device and slot should make matters easier. Test each version you're considering for a week. It is super important that you test! Sometimes problems crop up or you turn out to not like it!
Step 9: Once you find a distro you like and have tested, consider if you want to dual boot or completely wipe Windows. Some programs for work might require Windows or you might have a few games that ONLY work on Windows and that's perfectly fine! Just keep in mind, as of Windows 11, this option is not recommended. If you want to use dualboot, you want to keep Windows 10 and NOT update. There's great tutorials on how to make it happen, search engines should be able to point you to one.
Step 10: Fully install Linux and immediately update. Even the latest installers will not have the current security patches. Just let it update and install whatever programs you want to use.
Step 11: Enable compatibility tools in Steam if you're a gamer. File, options, compatibility. Also, check the Software Store in your OS for open source re-implementations for your favorite older games!
You're now a Penguin!
23 notes
·
View notes
Text
Gear Up! A Beginner's Guide to Learning Robotics
Hey Tech Enthusiasts!
Are you fascinated by robots and want to dive into the world of robotics? Learning robotics can seem daunting, but with the right resources and mindset, you can get started!

Step 1: Understand the Basics
- Familiarize yourself with programming languages like C++, Python, or Java
- Learn about electronics, circuitry, and microcontrollers (e.g., Arduino, Raspberry Pi)
- Get a grasp on mechanical concepts (e.g., kinematics, dynamics)
Step 2: Choose Your Path
- Robotics kits (e.g., Lego Mindstorms, Makeblock)
- Online courses (e.g., Coursera, edX, Udemy)
- Books (e.g., "Robotics, Vision & Control" by Peter Corke)
- Join online communities (e.g., Reddit's r/robotics, r/learnprogramming)
*Step 3: Practice & Build*
- Start with simple projects (e.g., line follower, robotic arm)
- Experiment with sensors, actuators, and control systems
- Join robotics competitions or hackathons
Step 4: Network & Learn from Others
- Attend robotics conferences, meetups, or workshops
- Collaborate with fellow robotics enthusiasts
- Participate in online forums
Resources:
- Code.org's Robotics Course
- Robotics Academy
- Robot Operating System (ROS)
Inspiration:
- Boston Dynamics' robots
- NASA's Robotics Alliance Project
- Robot Wars
Conclusion:
Learning robotics takes time, patience, and dedication. Stay curious, persistent, and creative!
What's your favorite robotics project or resource? Share in the comments!
[Reblog if you're interested in robotics!]
3 notes
·
View notes
Text

Navigating the Complex World of Mobile App Development
In today’s tech-driven world, mobile apps have become a cornerstone of how we connect, work, and play. Whether you’re launching a startup or enhancing an established business, building a mobile app can be a game-changing move. One of the most important decisions you’ll face is choosing the right technology stack. The tech stack you pick will directly influence your app’s performance, scalability, and overall user experience.
What Exactly Is a Tech Stack?
A tech stack is essentially the set of tools, programming languages, and frameworks you use to build your app. For mobile apps, the stack typically consists of three main components:
Front-End: This is what users see and interact with — the app’s interface.
Back-End: This is the engine under the hood — handling data storage, processing, and integrations.
Platform: The operating system your app is built for, like iOS, Android, or both.
Key Considerations When Picking a Tech Stack
Let’s dive into the options and what you should think about when deciding which tools to use.
Platform Options
Native Development
Languages:
iOS: Swift or Objective-C
Android: Kotlin or Java
Pros:
Best-in-class performance.
Full access to device features like cameras, sensors, and GPS.
Cons:
Higher costs.
Longer development time if building for both iOS and Android.
2. Cross-Platform Development
Frameworks:
React Native (JavaScript and React)
Flutter (Dart)
Xamarin (C#)
Pros:
Faster development.
Reusable code for both iOS and Android.
Generally lower costs.
Cons:
Slightly lower performance compared to native apps.
Limited access to some advanced native features.
3. Hybrid Development
Tools:
Ionic (HTML, CSS, JavaScript)
PhoneGap/Cordova (HTML, CSS, JavaScript)
Pros:
Easy to learn and work with if you’re familiar with web development.
Leverages standard web technologies.
Cons:
Performance is not as strong as native or well-optimized cross-platform apps.
User experience can feel less “native.”
How to Make the Best Choice for Your App
Your decision will depend on several factors. Here are some key points to consider:
App Complexity:
For simple apps, cross-platform frameworks like React Native or Flutter are great choices.
For feature-heavy or complex apps, native development might be the way to go.
Time to Market:
If you’re on a tight schedule, cross-platform tools can speed up the process.
Budget:
Native development can be pricey since you’ll likely need separate teams for iOS and Android.
Cross-platform and hybrid options are usually more cost-effective.
Performance Needs:
Native apps deliver the best performance, but modern cross-platform frameworks have come a long way and can handle most needs efficiently.
Team Expertise:
Leverage the skills your team already has. If they’re experienced in JavaScript, for example, React Native might be a natural fit.
Final Thoughts
Choosing the right tech stack is a pivotal step in mobile app development. It’s about finding the perfect balance between your project’s requirements, your budget, and your team’s expertise. By weighing factors like app complexity, performance, and cost, you can make a well-informed choice that sets your app up for success. Remember, a solid tech stack is the foundation of a scalable, user-friendly, and high-quality app.
#mobile app development#android development#ios development#hybrid app development#cross platform app development#technology#software development#programming
2 notes
·
View notes
Note
Hiya!! I am taking a coding course at a University. While it's excellent for learning how to use a lot of complicated concepts in programming, we don't really get to do any projects or create anything yet. I was wondering how to get into that. Are there any resources you might recommend?
Hiya!! 💞
Goodie, you want to build your own projects! That's so good, I love project building! Now, it depends what you're coding (the languages + specific area) e.g. are you learning HTML/CSS/JavaScript (Website building) or is it like Python/Java/C# idk but you get what I'm asking for here, the projects you want to learn and build depends on what you're learning in the first place! But I will give some general advice!

🎥 YouTube
I love YouTube so much, there are thousands of videos on that site for any programming language to building pretty much anything! What I did when I started off was the simple search of "[The coding language] beginner project" and then I get to see what I can build. Now if you get stuck on a snippet of code, Google it and there are sites that will explain it for you. Now, don't fall for tutorial hell where you're watching tutorial after tutorial videos but watching them will give you a good foundation!
🔍 Google
Similar to what I said for the YouTube way, you can Google the same question and it will give you a bunch of project ideas, how to even do them and all you can do also is add more on top, what I mean is don't just watch or read about a project idea, see how you can twist it your own style e.g. recently I watched a React.js tutorial on how to make a to-do app! My twist was I styled it different by adding a frog theme. So the tutorial was my foundation and I just added on top of that to further exercise my skills!
🌐 GitHub
Have a hub for all your projects! After creating your projects, you don't just want it sitting on your computer, you can put it online! I use GitHub - it's a place where you can store all your projects, have a save history so you can go back on old code, even share the static webpages you make (using HTML/CSS/JavaScript) with other people online! The Site | How to use GitHub | Check out my GitHub for reference
📚 Online Courses
Many online platforms offer project-based courses. Websites like Udemy, Coursera, Codecademy and FreeCodeCamp can guide you through creating practical projects step by step. I use Udemy for learning and there are courses that are like "Build 9 web development projects blah blah blah" they're actually really good! BUT you do have to pay for them but if you can't find a good project on YouTube to follow or you can visualise or understand the articles online on how to build one, I suggest getting a course because someone teaches you how to make the project. Udemy is fairly cheap during their sales, going down from £59.99 to £10.99!
🤗 Collaboration
Reach out to classmates to build together, someone is bound to have an idea for something! Collaborative projects not only expand your skill set but also let you learn from others. Great skill to have! You can even collab on GitHub projects - which I am doing right now with people I've met through Tumblr (checkout our project)!
Remember, Rome wasn't built in a day! Start with small projects, gradually challenging yourself with larger ones. The journey of creating is just as exciting as the finished project itself. Happy coding! 😎🙌🏾💻💗
43 notes
·
View notes